A 4×6 photo on 8×10 paper: what gets cut, and how to keep it
An 8×10 print is not a bigger 4×6. Their shapes differ. To fill a landscape 10×8 sheet with a 3:2 photo, you must remove one-sixth of the image area. If someone stands near the left or right edge, choosing “fill” can cut them off even when the file has plenty of pixels.
There are three useful choices: crop deliberately, keep the whole image with white space, or order a 12×8 print instead. This guide calculates each choice using the same 3000×2000-pixel landscape image. Rotate all dimensions for a portrait photo. A phone photo may be 4:3 or another shape; use its actual dimensions instead of assuming 3:2.
The missing sixth, in actual pixels
The paper ratio is 10 ÷ 8 = 1.25. Keeping the source’s full 2000-pixel height leaves room for a width of 2000 × 1.25 = 2500 pixels. That means 500 of the original 3000 columns have to go.
A centered crop removes 250 columns from each side. Moving the crop changes which columns disappear, not how many. A left-aligned crop can keep a person at the left edge, but it must remove all 500 columns from the right. If both outer edges matter, moving the crop cannot solve the problem.
The remaining image contains 2500 × 2000 = 5 million pixels, down from 6 million. The area lost is 1 − 5/6 = 16.7%. At 10×8 inches, the remaining pixels provide 250 native pixels per inch. That last number concerns density; it does not guarantee that a blurry original will look sharp.
Compare the three useful choices
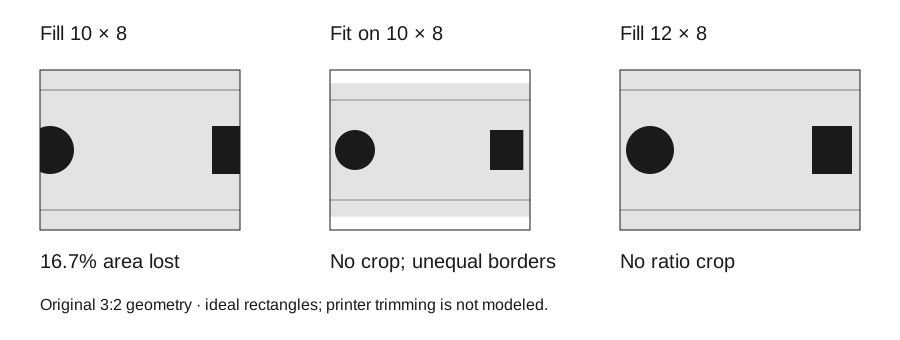
| Choice | Image on paper | Area removed | White space per edge | Native PPI |
|---|---|---|---|---|
| Fill 10×8 | 10×8 in | 16.7% | None | 250 |
| Fit on 10×8 | 10×6.67 in | None | Top/bottom: 0.67 in | 300 |
| Fill 12×8 | 12×8 in | None | None | 250 |
These are our calculated ideal rectangles, not measurements of a lab’s finished prints. In the fit option, the 1.33 inches of unused height is split between the top and bottom. Left and right have no white margin. “Keep all” therefore does not mean “equal borders.”
Choose 12×8 only if the destination accepts that size. It does not fit an 8×10 frame. If the frame is fixed, check the visible opening too: a frame lip or mat can hide image content even after you have solved the paper-ratio problem.
An equal half-inch border changes the problem
Subtracting a half-inch from all four edges of a 10×8 sheet leaves a 9×7 image window. Its ratio is about 1.286, still different from 3:2.
To fill that window, the source crop becomes approximately 2571×2000 pixels. You lose 14.3% of the original area, and the image has about 286 native PPI. You do get an equal half-inch border, but you do not keep the whole photo.
To preserve the whole photo with at least a half-inch margin, fit it into that 9×7 window. The image becomes 9×6 inches. The final borders are 0.5 inches left/right and 1 inch top/bottom. This is often the better choice for a group portrait: unequal white space is preferable to missing people.
Reproduce the comparison before ordering
- Open the Print Fit tool. Its demonstration grid uses the same 3000×2000 dimensions. Start with 10×8 and a zero border.
- Switch between Fill and Fit. Watch the crop percentage and border measurements, not just the small preview.
- Choose your own image. In Fill mode, move the horizontal crop position and inspect both outer subjects. A disabled vertical slider means there is no vertical crop to move.
- Enter a 0.5-inch minimum border. Decide whether an equal border or an uncropped image matters more.
- Download a copy, select the same physical print size at your lab, and review the lab’s final preview. Do not assume it will preserve the white border exactly.
Where the calculation stops
The Mpix preparation guide explains aspect-ratio cropping and recommends checking file sizing before ordering. Its instructions describe its own service; another lab may present different fit options. Source checked October 4, 2026.
Even a matching ratio does not guarantee edge-to-edge preservation. A home printer can enlarge an image for borderless printing, and a lab can trim it. Keep important content away from the final edge and see why a matching-ratio print can still lose its edges. There is no universal safe margin that we can promise for every printer or lab.
Check your image in the photo print toolThese calculations model geometry, not a physical print test. Printer behavior and lab order previews take precedence over this preview. Method, limitations & corrections